• Home
  • Curls
  • Beauty
    • Makeup
    • Skincare
    • Nails
  • Style
  • Lifestyle
    • Pregnancy
  • Videos
  • Contact
  • Resources
    • FREE Curly Hair Product Tracker
  • YouTube
  • Shop
    • Amazon
    • Etsy
    • Teespring Store
    • ObsessedWith.It
  • Links
  • 0
DiscoCurls
Curls. Beauty. Lifestyle.
Category:

Beauty

scalp scrubs

3 Scalp Scrubs to Exfoliate Buildup

by Rochelle March 19, 2020

Although they are not new products, scalp scrubs have been increasingly popular to remove buildup, dirt, and clarify the scalp. They are something that I’ve found incredibly helpful since I do nightly scalp massages with oil. So I thought I’d share 3 scalp scrubs that I put on rotation to exfoliate buildup.

Why Scalp Scrubs are Helpful

Like a facial and body scrub, scalp scrubs help remove product buildup, impurities and dead skin cells to reveal clean roots. Scrubs help clarify the scalp and hair which in turn can bring more volume. Using them depend on their specific directions plus other factors like hair color.

To my knowledge, if you have a scalp condition, eczema, psoriasis, irritations, sores or cuts on your scalp you should NOT be using a scalp scrub as it may cause further irritation.

3 Scalp Scrubs That I Love

Scalp scrubs can be physical or chemical but I seem to prefer physical exfoliants better. Here are my current favorites.

Not Your Mother’s Activated Bamboo Charcoal & Purple Moonstone Restore & Reclaim Scalp Scrub

This pre-wash scalp scrub is gentle and uses natural jojoba wax beads to exfoliate. Made with 98% natural ingredients, it doesn’t contain sulfate surfactants, silicones, parabens, dyes, gluten, or phthalates.

Subscribe for your FREE Curly Hair Product Tracker

* indicates required

I like to use this at least one or two days per month on the days I clarify. Because it is considered a pre-wash, I apply a generous amount onto my wet hair before I shampoo. Then, I use the pads of my fingers to gently massage. What I love about this scrub is that it doesn’t feel harsh when I apply it.

After rinsing it out well my scalp feels smooth and refreshed. I can continue with my shampoo and conditioner routine without feeling stripped.

Briogeo Scalp Revival Charcoal + Coconut Oil Micro-Exfoliating Shampoo

If you suffer from a dry, irritated scalp, dandruff or just need something to remove heavy buildup, this micro-exfoliating shampoo is your product. Because the shampoo already includes a vegetable derived exfoliant, after rinsing you can go straight to conditioner.

Although it’s on the pricier side, this has been one of my personal favorites. I’ve always been obsessed with the tingling in my shampoo and this has peppermint and spearmint that cools my scalp. Plus, it contains Binchotan charcoal to remove impurities and coconut that moisturizes. After rinsing it out, my hair feels more hydrated than expected.

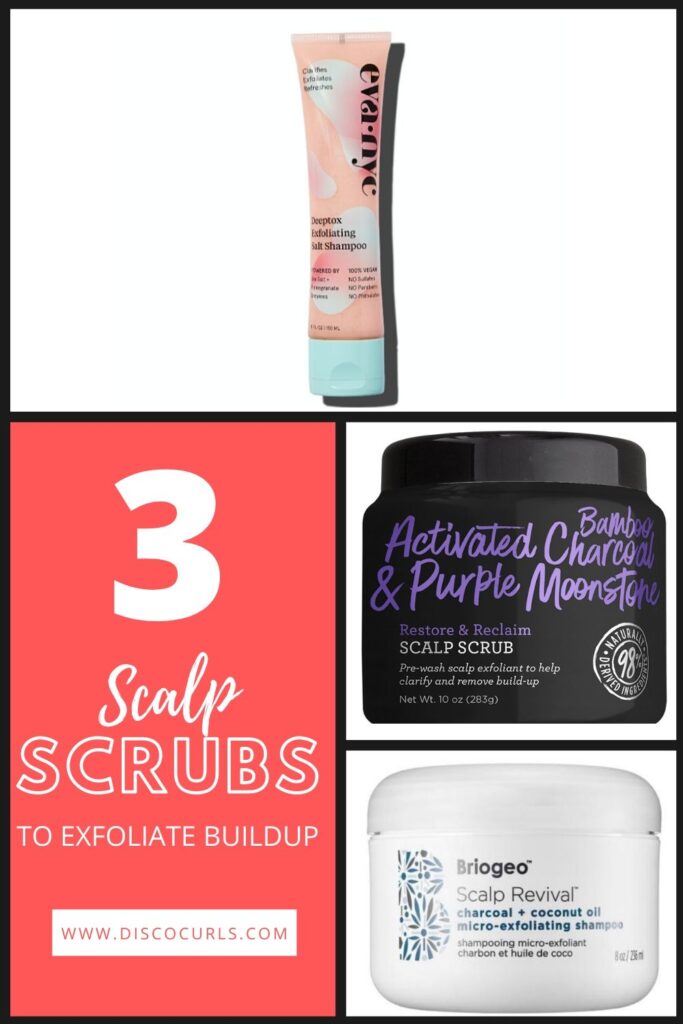
Eva-NYC Deeptox Exfoliating Salt Shampoo

This new kid on the block is another unique scrub shampoo combo that exfoliates and cleanses the scalp in one easy step. Similar to most other Eva NYC products, it contains Argan Oil to hydrate and nourish, as well as the brand’s own Keravis Protein Complex to strengthen strands at the root. Best of all, it doubles as a body scrub to smooth rough patches on the body.

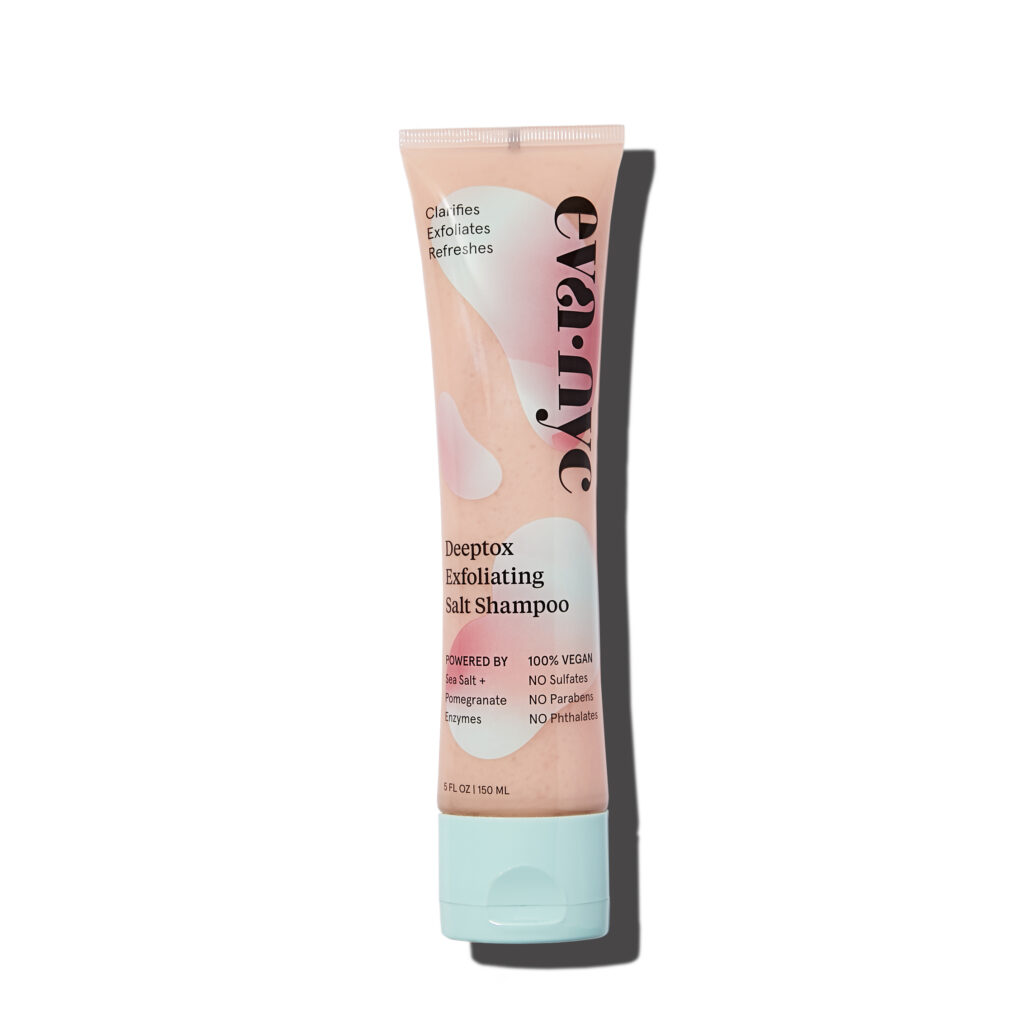
In addition, it includes sea salt, pomegranate extract, and witch hazel.

·         Sea Salt – Physically scrubs away dead skin cells and product buildup. Also increases blood circulation, promoting a healthy scalp

·         Pomegranate Extract – Known for its potency of antioxidants, this ingredient keeps you beautiful inside and out. In this formula, the extract provides purifying and anti-inflammatory benefits

·         Witch Hazel – A commonly known natural astringent, it clarifies the scalp and normalizes oil production

Sea salt is not something I normally use on my scalp and hair because it can be a bit drying. However, the mixture of argan oil helps it feel slippery while applying. This creates a nice sudsy consistency and a little goes a long way.

Out of the three scalp scrubs mentioned, this felt to be the most clarifying. With that being said I may only use this about once a month on my scalp and I do recommend following up with a deep conditioner after use.

Have you ever tried a scalp scrub on your curls? What were your results? Share with the community down below in the comments.

2 comments
0 FacebookTwitterPinterestEmail
curly hairstyles

Easy Curly Hairstyles for Busy Moms

by Rochelle March 11, 2020

Do you find that you have very little time to style your curly hair as a mother? Well, after having a 2.5 year and 14 month old I have learned that time is truly of the essence. Luckily, I’ve come up with 3 easy curly hairstyles that any mom can do in just a few minutes.

I really wanted to share a few styles that you can complete in minutes because I remember how hard it was to be pregnant while chasing a toddler. I had no time to spend on my hair (and still don’t) but wanted to make somewhat of an effort. Here are a few easy styles to try.

3 Easy Curly Hairstyles

Half Up Half Down With Mini Clips

Using mini clips brings me back to the 90’s and early 2000’s. It was such a huge part of hairstyles to include them and use different colors.

For this style, start by gathering a small horseshoe sized section up front for the half up part of your style. No need to make the section perfect as it is meant to be unpolished. Within that section of hair, create three mini sections and use mini butterfly clips at the base to hold and create lift.

Curly Hairstyle

Curly Low Twisted Bun

Using the same horseshoe sized section, I pull back my bangs to create a pouf and then secure it with bobby pins. Then grab two large sections from each side of your head but in front of your ears. Gather the two sections towards the back of your head into a loose ponytail and secure it with a tiny elastic.

With that same ponytail, create a hole above the elastic and flip the tail into the hole. Pull the tail through. Then, repeat this step until the tail is hidden to create a bun. Add pins as needed.

You will continue making two more ponytails and repeating the process. The bottom ponytail can be left out or put into a bun. Add embellished pins , a head wrap, or combs to dress it up.

Curly Updo

Braided Curly Half Updo

For the last style, use the same horseshoe section and create a braid that falls to one side. Create another single braid at the front that’s falls to the other side off center. Pin the two braids together at the center of your crown. Add decorative gold or silver cuffs to the braid.

Braided Curly Half Up Hairstyle

Want a video tutorial on these easy curly hairstyles? Watch my YouTube video below.

1 comment
0 FacebookTwitterPinterestEmail
transitioning curls

10 Tips for Transitioning Curls

by Rochelle February 28, 2020

The transition from straight to naturally curly is not the easiest process. It’s a journey, right? If you’re not going to do the big chop, then you have a whole other set of obstacles to face. So, I’m going to share my favorite 10 tips for transitioning curls.

While I was transitioning, YouTube wasn’t as popular as it is now and the amount of influencers that I could relate to varied. I relied heavily on my hairdressers and friends with curly hair to figure it out. So I want to share a few general rules along with my personal tips for a successful transition.

#1 Stay Away from the Heat!

No blowouts or hot tools. Heat damage is probably the worst thing you can do while transitioning. It’s also the hardest part of the entire process, especially if that is what you’re used to doing daily. Trust me, you’re going to get frustrated as you watch some areas grow in curly while the ends are straight. However, there are solutions for that (See #7 below). Also, occasionally straightening your hair with hot tools can possibly start you back at square one.

#2 Stay on top of your trims.

You don’t have to big chop but what I noticed is that everytime I trimmed, my curls got a little tighter and bouncier. That’s because I was slowly removing the dead ends. Think of it as dead weight just holding your curls back from their full potential.

#3 Consider a Protective Style

This tip is not totally necessary but it was what I personally did while I transitioned. My hair was damaged so badly with bleach and relaxer and it started breaking off. I put in a partial sew-in weave because I was feeling so embarrassed .

The majority of my hair was in a protective corn-row with my hairline and a horseshoe section left out. That was done so I could hide the weft and occasionally put my hair up into a ponytail. There were pros and cons to this but it helped the hair growth transition move faster while hiding the damage. Find out my pros and cons of wearing a sew-in weave for long periods of time.

Subscribe Here for my FREE Curly Hair Product Tracker

* indicates required

#4 Limit Your Use of Silicones

Silicones offer a temporary solution for frizz, they help with slip in our conditioners, and add shine but it’s short lived. In the long term, they can weigh down your curls and cause buildup. They are harder to remove so you really need to clarify to get them out of your hair. The more often you use silicones, the more often you will have to clarify. A consistent cycle can lead to further dryness.

In my opinion, silicones are not that evil. In fact, there are a few instances when I think they’re ok. For example, if you swim in chlorinated water, silicones can help create a barrier between your hair and the chlorinated water. They also provide protection from heating treatments (if you still use them while transitioning). However, certain oils, conditioners, and using a swim cap can offer the same protection without the use of silicones.

image of rochelle masella with damaged curls vs healthy curls

#5 Don’t Forget to Clarify!

It might sound like I’m contradicting myself after reading #4 but it’s still important to clarify. Excess buildup, debris, and possible fungus can happen and cause a number of problems if it’s not addressed.

My weekly wash and go’s go something like this. Wash the hair twice per week. Co-wash one day and clarify the other. Because I hardly use silicones, I can safely use gentle clarifying shampoos like Kinky Curly Come Clean Shampoo to clarify.

However, if you do use products that contain non-soluble silicones you will more than likely need a sulfate shampoo to get rid of the buildup. Just be sure to follow up with a deep conditioner afterwards.

#6 Weekly Deep Conditioners

Repairing your hair with deep conditioners while it is transitioning is a definite yes because you want to prevent further damage. I found it common to experience breakage and thinning at the line between new growth and the relaxed/heat damaged hair.

#7 Train Transitioning Curls with these Tips

Finger coils are amazing for transitioning curls. They keep the curls uniform and just train problem areas. You can also use perm rods or flexi-rods on straight ends to help match you natural curl pattern.

#8 Search for your Curl Twin and Not Your Curl Crush

There’s a big difference between relating and wanting. Don’t expect to get the same results as your curl crush if you don’t share the same hair texture, porosity, and density. You may not get the results they get. They might offer great general advice but listening to your curl twin will give you a more realistic expectation.

#9 Rotate Your Products

If you’ve been using the same product for a while and your curls don’t look like they first did, try something new. You’d be surprised how a simple switch can revive your transitioning curls.

#10 Embrace the Journey.

It’s not going to be easy. You will learn a lot but the transition itself does feel like a transformation from within. I felt so happy when I reached the end of my journey. Through experience and a lot of trial and error, I feel a bit like a curl expert ready to exchange my expertise to someone in need of curl advice.

I’d love to hear from all of you about your favorite transitioning tips down below in the comments. Want to hear more transition tips for curls? Watch the video below.

0 comment
1 FacebookTwitterPinterestEmail
image of hair dryer and hair tools

Sew In Weave Pros and Cons (On Fine Curly Hair)

by Rochelle February 22, 2020

Over a decade ago, I wore a sew in weave on my fine curly hair. There were many factors as to why I did but it truly came down to my insecurities. My hair was damaged so badly with bleach, relaxer and started to break off. So, I thought I’d share the pros and cons that I experienced from wearing a sew-in weave.

How It Began

This was back in the early 2000’s at a time when I still hated my curls and naturally curly hair was not as normalized as it is now. You didn’t see celebrities, models rocking their natural curls. The majority of them were using flat-irons, still relaxing, wearing weaves and wigs. Plus, I was young and very influenced by it. 

In my eyes, I wanted to fit into the norm. I figured as long as my hair was in the condition it was, wearing a weave would hide and conceal my damage. When it came time to get my weave, the majority of my hair was in a protective corn-row with the hairline and a horseshoe section left out. My tracks were sewn in with a needle and thread. This was done to hide the weft and so I had the option to put my hair into a ponytail.

Image of girl with fine curly hair

Pros and Cons of Wearing a Sew In Consistently

There were some pros and cons to wearing that type of weave. The pros included impressive hair growth every time we took it down to install new tracks. Another pro is that no one noticed the transition. My hairstylist took out my tracks and braids monthly, washed my hair, gave it a treatment, and trimmed my ends. Then we’d braid it back up and add the tracks again.

However, there were major cons that I blame myself for. For instance, I wasn’t giving my hair a break from the high tension protective style and the weight of the hair. It put so much stress on my hairline. My insecurities let me keep repeating this process for 8 YEARS causing traction alopecia that I still deal with to this day.

On top of that, I wore tracks that didn’t match my hair texture so I was constantly manipulating my natural hair texture with hot tools. While the braided areas were doing great and feeling healthier, my hairline and the horseshoe section had heat damage.

What I Learned

Looking back at that time and knowing what I know now, here’s what I would have done differently. I would have found my exact hair texture in those tracks just to avoid the heat damage. In addition, I would have also trained my hair to match my hair texture by using heatless options like perm and flexi-rods.

I definitely would have taken at least a month off in between each installment and for the sake of my edges. The stress and consistent tension were avoidable and completely my choice. The lesson learned here is finer, low-density textures have to be careful with high tension styles, heavy braids and twists.

Have you experienced traction alopecia from wearing weaves and high tension hairstyles? Share with me down below in the comments.

1 comment
0 FacebookTwitterPinterestEmail
Winter Wash and Go Routine

Winter Wash And Go for Fine, Curly Hair

by Rochelle February 6, 2020

If you are looking for the perfect winter wash and go routine for fine curly hair, then look no more! This detailed hair routine not only moisturizes but adds volume. Follow these step by step directions on exactly how I wash my fine curly hair during the colder months.

This method can be done at anytime of year but because the hair typically drier (and takes longer to dry when it’s cold), this may be more helpful. In a nutshell, it’s my normal hair care routine enhanced with additional techniques and devices.

My Winter Wash and Go Routine

Before hopping in the shower, I like to do a pre-poo with a deep conditioner. The reason is because it helps soften and make the detangling process a bit easier. Plus, I spend less time in the shower.

Because I’m not following the traditional rules of applying my deep conditioner after washing my hair, I like to get my hair damp with a spray bottle. This ensures that I’m adding moisture first.

After my hair is damp, I create a mixture of my deep conditioner with sweet almond oil. Then, I apply this to my hair in sections. The next step is crucial for adding maximum moisture, using my Q-Redew. By using this handheld hair steamer, I’m able to blast the hair with moisture and make conditioner penetrate deeper. I use the prongs to steam and detangle then clip those sections back.

Once all sections are complete, I put on a disposable cap and leave it on for 20-30 minutes. Then, I wash and condition my hair as normal. The only real difference in the styling portion of my routine is including plopping.

winter wash and go on fine curly hair

How to Avoid a Wet Head Outside

Plopping is a way to absorb excess water and product from the hair to help the hair dry quicker. Plus, it can create lots of volume to your curls.

After I apply my styling products, I use a large t-shirt to plop. You can do this overnight or after your normal wash routine. During the winter, it’s helpful to use a diffuser on a low speed and heat setting to avoid having wet hair outside.

What are your thoughts on my results? Will you try this method and also share your winter curly hair tips below in the comments.

0 comment
0 FacebookTwitterPinterestEmail
photo of yellow banana

Baby Food Hair Mask for Dry, Curly Hair

by Rochelle February 5, 2020

There are tons of DIY Hair Mask recipes out there in the world but did you know that using baby food can simplify the process? Well, find out why making a baby food hair mask is beneficial and try this recipe for your next DIY.

Some of you might wonder, why I would use baby food in my hair? Here are three reasons why.

  1. Baby food helps cut the prep time in half by already being pureed and super smooth.
  2. You don’t have to worry about hard-to-rinse-out food particles or large chunks in the hair.
  3. It’s affordable. You can get a jar of baby food for about a dollar and up.

Banana Baby Food Hair Mask

One of my favorite easy hair masks uses banana baby food. Banana is literally one of the hardest fruits to get out of your hair so I really appreciate using jarred or pouch style for any type of hair mask that requires a banana. I recommend using organic blends for these types of hair masks to avoid the added preservatives.

This is such an easy recipe because it only includes 3 ingredients.

  • 1 Jar or Pouch of Banana Baby Food
  • 2 tablespoons of olive oil
  • 1 tablespoon of honey

Bananas are super hydrating, contain potassium, and are helpful with dry scalp. Olive oil nourishes the scalp, conditions the hair, and improves elasticity. Lastly, honey is an excellent humectant that treats dandruff, conditions, moisturizes and makes the hair shiny.

image of curly hair after using a hair mask

I like to have a few other tools handy when I’m doing DIY masks to avoid a mess. First, I make sure to cover my shoulders with a towel. Also, I like to use a hair coloring brush for the application and a disposable shower cap that I can throw away after I’m done.

How to Make & Apply Mask

The first thing I do is combine all of the ingredients. I get a small bowl and add my jarred banana baby food, olive oil and honey. You can use a fork or a whisk to blend it together and then your mask is ready to go.

If your hair and scalp are dirty and due for a wash then cleanse first then proceed to the next step. If not, then rinse and detangle the hair well.  Next, part the hair into 4 sections and start applying the hair mask from the back working up to the front. I like to make sure that all of my strands are saturated well. Then I clip my hair back and put on my plastic cap. Leave it sitting for 20-30 minutes.

After 20-30 minutes rinse it out. Even though you are using pureed baby food, it is extremely important to rinse well. An additional option is to do an additional co-wash with conditioner to help remove any remaining bits of food.

In general, treat this DIY like you would any other deep conditioner and do it once a week for long-lasting results. Every time I do this, my hair feels soft and restored. If you enjoyed learning about this, feel free to leave a comment and also share your favorite DIY hair masks below!

0 comment
0 FacebookTwitterPinterestEmail
curly hair woman

DIY Pumpkin Hair Mask for Dry, Winter Hair

by Rochelle November 29, 2019

Obsessed with pumpkin spice during the holidays? If you’re like me it enters your life during the fall season and puts you right into the spirit. Not only does pumpkin smell and taste heavenly but it can work wonders as a hair mask. So I’m going to share an easy DIY pumpkin hair mask that will soften and moisturize your dry winter hair.

What does Pumpkin do for the Hair?

If you are wondering why pumpkin works in a hair mask, let’s break it down. First, it’s filled with nutrients that are beneficial to the hair. Vitamin A helps the skin (scalp) produce healthy oils. Potassium, also found in bananas, help strengthen the hair, and vitamin E to stimulate the scalp and promote hair growth.

In addition, if you are working with pumpkin seed oil you are soaking up tons of essential fatty acids that help the hair retain moisture and help with dry skin.

Ultimately, pumpkin is the perfect ingredient for this DIY hair mask to combat dryness and smell like the holidays!

How to make the Pumpkin Hair Mask

For this mask, you have the option to use cooked, pureed pumpkin or canned pumpkin. I happened to have a leftover can of pumpkin so for the sake of this tutorial, I chose the easy route.

  • 1 cup of canned pumpkin
  • 2 tablespoons of virgin coconut oil
  • 2 tablespoons of honey

Combine all of the ingredients. The canned pumpkin, coconut oil, and honey into a mixing bowl and mix well with a fork.

Once the mixture is ready, start by applying this to wet, sectioned hair. You can wash with a shampoo first or just wet and rinse it. Some people may want to shampoo after but I prefer to rinse this out and do a co-wash. That way my hair doesn’t feel stripped afterwards.

Once it’s saturated, I add a disposable shower cap to lock in the heat. Then, I leave the hair mask on for about 15-20 minutes.

After the times up, rinse out the hair mask really well then co-wash with a conditioner. After rinsing out my conditioner, I follow up with my stylers and let my hair air dry.

My hair always feels soft, hydrated, strong and shiny after doing the DIY pumpkin spice hair mask. What’s your favorite DIY hair mask or treatment? Share with the community down below in the comments.

1 comment
0 FacebookTwitterPinterestEmail
must have items for fine curly hair

10 Must-Have Items for Fine, Curly Hair

by Rochelle November 18, 2019

Having the right products and tools are important to avoid flat, lifeless hair. That’s why this list of my 10 must-have items for fine, curly hair was created. If you love volume and making your curls appear thicker than they really are, continue reading below.

Must-Have Curly Hair Products

1. Clarifying Shampoos

Clarifying shampoos are a must-have item for fine curly hair because of how easily it gets weighed down. It’s important to remove the excess buildup to keep it from looking flat. Many of the clarifying shampoos seen in stores contain sulfates but there are many options that are sulfate-free and do a really good job of cleaning the scalp and hair without stripping it down completely.

My favorites: Kinky Curly Come Clean, DevaCurls Buildup Buster and Eden Bodyworks Peppermint Tea Tree Shampoo.

2. Gels

Introducing gels back into my routine took some getting used to. That’s because in my youth, gels made your hair as stiff, crunchy and used a lot of alcohols. However, the gels of today are more innovative. They can hold a style for long periods of time, give major definition, and leave the curls soft to touch (after breaking the curl cast of course). In my experience, gels make my curls tighter, which in turn, helps add volume.

My favorites: DevaCurl Ultra Defining Gel, Ouidad Advanced Climate Control Heat & Humidity Gel and Briogeo’s Curl Charisma Rice Amino & Quinoa frizz control gel.

3. Leave-In Conditioners

Conditioner, in general, is an important step for all curl types but for low- density curls you can choose to skip the heavy conditioners and go straight to a leave-in. Choose a lightweight formula that has great slip to help detangle and lightly moisturize. For myself, I typically use a conditioner on my ends then follow up with the leave-in to start my stylers. Use trial and error to see what works for your curls and density.

My favorites: Not Your Mothers Naturals Tahitian Gardenia & Mango Butter Detangler, DevaCurl Decadence Leave In, SheaMoisture 100% Virgin Coconut Oil Leave in Treatment.

4. Volumizers & Thickeners

The most important category in this article include styling products that volumize and thicken the hair. These include thickening creams, sprays, and mousses. They add body and volume to the hair and some of them, like a thickening cream, can help clump up curls to give the appearance of thicker hair.

My favorites: Hask Biotin Boost Thickening Cream, Aveda Volumizing Tonic, Not Your Mothers Curl Talk Curl Activating Mousse.

Curly Hair Tools

5. Q-Redew

The Q-Redew is definitely a staple in my cabinet. The reason that this is awesome for fine curls is because it can add volume. When you place the prongs near the scalp and apply a little steam it lifts and plumps up your roots. That is just one way to use the Q-Redew but if you want to learn more, watch this video.

6. Blowdryer With Diffuser Attachment

Investing in a really good blow dryer and diffuser attachment is well worth it. My DevaDryer has been by my side for a few years and I have never had a problem with it breaking. In addition, it’s lightweight, has 3 temperature settings, 2 speed settings and a cool shot button. The DevaFuser is where the magic happens though because it’s got a really different shape to it that resembles your hand. It cradles your curls gently while you dry them. The fingers also slide easily into your roots to dry them quickly.

Although the DevaFuser is great for quickly drying my roots, standard diffusers really buildup volume. A collapsible diffuser is also a great space saver and great for the toiletry bag.

Subscribe Here for my FREE Curly Hair Product Tracker

* indicates required

7. Duckbill Clips

Duckbill clips are a necessity for fine curly hair because they can be clipped at the roots to build volume during the drying process. They are also helpful clipped on the ends to help stretch any shrinkage.

8. Afro Pick

No purse is complete without our trusty Afro-Pick. A must-have for all curly girls but especially for those with fine curls because our roots gets flat quickly. Unfortunately, it’s not a one and done process. I’m someone that uses it constantly to keep my hair looking full.

9. Mini-Clips

Tiny mini-clips ones can easily be hidden near your roots to keep flat areas up for long periods of time. If you are scalpy, you are not going to want larger clips or you will see them peeking through.

10. Hair Fibers & Root Touch Up Kits

Last on the list are hair fibers and root touch up kits. These are my secret weapons because not only is my hair low-density but I have traction alopecia. Having a product like Toppik Hair Building Fibers, an eyeshadow, or a root touch up spray can conceal and fill those thinning areas. It’s beneficial for the times you wear your hair back in updos or ponytails.

What are some of your must-have items for fine curly hair? Share all of them down below in the comments.

Watch the video here: https://youtu.be/o8BEoavML2k

0 comment
0 FacebookTwitterPinterestEmail
Belle Bar Organic Tea Rinse

Belle Bar Organic Tea Rinse

by Rochelle November 3, 2019

Lately, my dry and itchy scalp have created the need for something new in my hair care rotation. That’s why I was excited to try the Belle Bar Organic Tea Rinse. I was introduced last year to their brand because they customize ingredients to work specifically with your hair concern.

In addition, their pre-packaged DIY kits don’t require you to search for hard-to-find ingredients. Sounds like a win-win for anyone that likes the convenience. Check out these details on Belle Bar Organic and how it worked on my fine, curly hair.

What is Belle Bar Organic?

Their website states, “Belle Bar’s entire mission is to make women of color believe in the importance of living a life free of toxins, harmful chemicals, and inorganic ingredients, especially in our beauty products.”

Their organic, customizable hair and skincare brand uses high-quality ingredients that takes the guesswork out of what’s in your products. This brand uses natural ingredients that aren’t normally lying around in your kitchen but seen in many popular hair products.

Unfortunately, the Scalp Balancing Custom Tea Rinse (my favorite) no longer appears to be on their website but they do carry another tea rinse that looks promising.

That particular tea rinse was designed for irritated scalps, dandruff, thin and shedding hair. It contained hops flowers for it’s anti-inflammatory properties, rosemary leaf to promote thicker, stronger hair, lemongrass to strengthen hair follicles and witch hazel to soothe the scalp.

How to do a Tea Rinse with Belle Bar Organic

One way to do a tea rinse is to begin brewing one teaspoon of the tea mixture in the provided tea bag (similar to brewing a cup of tea). Wait to let the tea mixture cool then pour it into a spray bottle. The mixture can be used on the scalp and curls and stays fresh for a week in the refridgerator.

Another great option is to spray the mixture to relieve a tight and itchy scalp from braids or twists.

Additionally, the strained tea rinse can be poured onto your hair after your shampoo and before a deep conditioner. The Belle Bar Organic Waikiki Restorative Hibiscus Hair Mask is a perfect addition to help hydrate dry, damaged, broken hair. See how I did it here.

Overall their tea rinse made my scalp feel clean, less itchy and was an incredible prep for my styling products. If you have tried this tea rinse, be sure to share your experience down below in the comments.

DIY Tea Rinse for Healthy Hair & Scalp

1 comment
0 FacebookTwitterPinterestEmail
Volumizing Products for fine curly hair

Volumizing Products for Fine Curly Hair

by Rochelle October 28, 2019

My favorite volumizing products for fine curly hair plump and thicken it. Sharing my personal favorites is necessary because so many of you ask what products will make your hair bigger. So stay tuned as I share the shampoos, sprays, lotions, mousses, creams, and fibers that give me my best hair days.

Before starting this list let’s disclaim that what may work for one person may not work for another. Different curl types, color-treated hair, and other reasons can factor into this. Some products might be too heavy or too light for your curls or maybe you don’t want to use certain ingredients. In these instances, trial and error is your best friend during your product search.

Shea Moisture Dragons Blood Sham & Coffee Cherry Volume +

SheaMoisture Dragon’s Blood & Coffee Cherry Volume + Shampoo & Conditioner

This lightweight formula is designed to plump up flat, thinning hair. It’s a gentle sulfate-free formula that contains dragons blood, coffee cherry, shea butter as well as black currant and borage oils. The shampoo surprisingly made my hair feels soft and had great slip. Many shampoo’s of my past haven’t always offered those two factors.

The conditioner is also light but still moisturizes well. It’s perfect for finer curls and a good prep for your stylers so that your curls are weightless.

Aveda Volumizing Tonic

Aveda Volumizing Tonic

A newer product in my curl arsenal is the Aveda Volumizing Tonic. This spray contains certified organic aloe and wheat amino acids to build body and add shine. It’s intoxicating scent is because of Aveda’s  pure-fume™ mixture of jasmine, rose, certified organic clove and other pure flower and plant essences.

While the hair is still damp, I spray a generous amount of this into my roots. Then to make the curls weightless, I pair a volumizing mousse to add lift and body. For maximum volume, a blast from the blowdryer with a diffuser attachment adds maximum volume.

Not Your Mother's Curl Talk Curl Activating Mousse

Not Your Mother’s Curl Talk Curling Mousse

While on the subject of mousses, a hot ticket item is the Not Your Mother’s Curl Talk Curling Mousse. This particular one is free of alcohol, parabens, dyes, phthalates and now even silicones. It keeps your curls moisturized and defined but very soft with a light hold. It also provides humidity control and it’s safe for natural and color treated hair.

Mousses give curly hair a ton of volume which just makes the hair look thicker than it actually is. This is one of those products that I just love because it gives me 2nd day hair on day one.

Hask Biotin Boost Thickening Cream

Hask Biotin Boost Thickening Cream

This next product WAS my favorite until learning it was discontinued. It’s still available on some websites (as of now) which is the only reason to include it. The Hask Biotin Boost Thickening Cream is amazing because it is one of the only creams that clumps my curls together to make them look thicker. It contains biotin, collagen and coffee and it’s free of sulfates, parabens, phthlates, gluten, drying alcohols and artificial colors.

The cream formula is lightweight and used prior to my styling cream and after my leave-in conditioner. However, this favorite has a short timeline so if anyone can find a replacement, please comment below!

OGX Moroccan Sea Salt Spray

OGX Moroccan Sea Salt Spray

One rule that curly girls have been taught is too not use products that dry out the hair. However, rules are meant to be broken which is why I’ve incorporated a sea salt spray into my routine.

An affordable option is the OGX Moroccan Sea Salt Spray. It has a beautiful beach-like fragrance and contains sea salt for texture and sea kelp for moisture. However, don’t get too excited because it will not moisturize your hair. This is not a product that needs to be used daily or in large amounts to be effective but it works well to make your hair look full fast.

Plan on deep conditioning one to two times per week if you plan to use sea salt sprays. In my experience, using it on 2nd or 3rd day hair that already has a cream buildup has worked best. Spray this from the mid shaft area down to your ends while the head is flipped upside down and do some light scrunching. Once it air drys, your hair will get major volume.

Some also like to use this on damp hair but just be sure to detangle well prior to using it. Using it in conjunction with a moisturizing curl cream has shown the least drying results but I still prefer using it on old hair.

Toppik Hair Building Fibers

Toppik Hair Building Fibers

Lastly on my list are Toppik Hair Fibers. This is one of my best kept secrets because people constantly comment on how my hair looks so thick but it’s all lies! This is a scalp, edge, and part concealer that looks so natural. It will fill in your thinning areas, conceal hair loss, provide a root touch-up between coloring and makes fine hair look thick and full.

The product itself is made of keratin protein that attaches itself to your existing hair to make it look thicker. This also washes out easily and it’s wind, rain, and perspiration resistant.

And that completes the list of my favorite volumizing products for fine, curly hair. Please comment below and share your personal favorites with me!

3 comments
0 FacebookTwitterPinterestEmail
Newer Posts
Older Posts

Newsletter

Keep in touch

Instagram Pinterest Youtube
discocurldesigns - Etsy
Shop Curly Hair Merchandise by discocurldesigns located in LA, California.
  • Facebook
  • Twitter
  • Instagram
  • Pinterest
  • Youtube
  • Contact
  • Privacy Policy

© 2016-2023 DiscoCurls.com. All Rights Reserved.


Back To Top
DiscoCurls
  • Home
  • Curls
  • Beauty
    • Makeup
    • Skincare
    • Nails
  • Style
  • Lifestyle
    • Pregnancy
  • Videos
  • Contact
  • Resources
    • FREE Curly Hair Product Tracker
  • YouTube
  • Shop
    • Amazon
    • Etsy
    • Teespring Store
    • ObsessedWith.It
  • Links

Shopping Cart

Close

No products in the cart.

Close